5 Simple Steps to Upload Your KineMaster Videos to YouTube
KineMaster is a powerful video editing app that has gained immense popularity among content creators, both beginners and professionals alike. With its user-friendly interface and robust features, it allows you to create high-quality videos directly from your smartphone or tablet. However, creating a great video is just the first step. To share your masterpiece with the world, you need to upload it to a platform where people can see it. YouTube is the go-to platform for video sharing, with billions of users watching videos every day. Uploading your KineMaster videos to YouTube is a straightforward process, but it requires a few steps to ensure everything goes smoothly.
In this guide, we’ll walk you through five easy steps to upload your video from KineMaster to YouTube. Whether you’re new to video editing or a seasoned pro, these steps will help you get your content online quickly and easily. We’ll cover everything from finalizing your edits in KineMaster to adjusting your YouTube settings before publishing. By the end of this article, you’ll have all the knowledge you need to confidently upload your videos to YouTube and share them with a global audience.
Also Read: Keep KineMaster Updated with These 4 Easy and Effective Methods
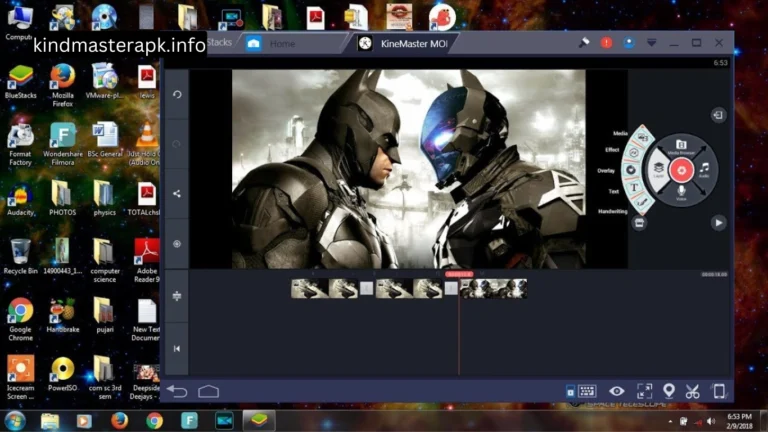
Step 1: Edit and Finalize Your Video in KineMaster
The first step in uploading your video to YouTube is to make sure it’s polished and ready for the world to see. KineMaster offers a wide range of tools that allow you to edit your video to perfection. Whether you’re cutting clips, adding transitions, applying effects, or inserting music, it’s important to take your time to ensure everything is just right. Here’s a detailed guide on how to finalize your video:
Review Your Footage
Start by reviewing all the footage you’ve imported into KineMaster. Play through each clip and decide what should stay and what should be cut. This is where you trim any unnecessary parts and make sure the flow of your video is smooth. Use KineMaster’s trimming and splicing tools to remove unwanted sections and to stitch your clips together seamlessly.
Add Transitions
Transitions are crucial for making your video look professional. KineMaster offers a variety of transition effects, such as fades, wipes, and slides. Apply these effects between clips to create a smooth flow from one scene to the next. Be careful not to overuse transitions, as too many can make your video look cluttered.
Insert Text and Titles
Text and titles can enhance your video by providing additional information or context. KineMaster allows you to easily add text overlays, subtitles, and titles. Choose fonts and colors that match the tone of your video. Make sure the text is legible and appears long enough for viewers to read.
Add Music and Sound Effects
Music and sound effects can greatly enhance the mood of your video. KineMaster lets you import your own audio files or choose from a selection of built-in music tracks and sound effects. Make sure the audio levels are balanced so that the music doesn’t overpower any dialogue or important sounds in your video.
Apply Filters and Effects
Filters and effects can give your video a unique look and feel. KineMaster offers a variety of options to adjust the color, brightness, contrast, and more. Experiment with different filters to see what works best for your video. Remember, the goal is to enhance your video, not distract from it.
Preview and Adjust
Once you’ve made all your edits, it’s time to preview your video. Play it from start to finish and look for any mistakes or areas that could be improved. Check for things like awkward transitions, text that’s hard to read, or audio that’s too loud or too soft. Make any necessary adjustments to ensure your video is the best it can be.
After finalizing your edits, you’re ready to move on to the next step—exporting your video.
Also Read: KineMaster 7.4.10.32410.GP Old Version:
Step 2: Export Your KineMaster Videos
Exporting your KineMaster videos is a crucial step in the process of uploading to YouTube. This is where all your hard work comes together, and your video is saved as a file that can be uploaded to the internet. KineMaster Videos makes exporting simple, but there are a few settings you’ll want to pay attention to in order to ensure your video looks great on YouTube.
Choose the Right Resolution
Resolution is one of the most important factors to consider when exporting your video. The resolution determines how clear and sharp your video will appear. For YouTube, the recommended resolution is 1080p (1920×1080 pixels), which is considered Full HD. This resolution strikes a good balance between quality and file size, making it perfect for most YouTube content. If you’re filming in higher quality, such as 4K, you can export at that resolution too, but keep in mind that larger files will take longer to upload and process.
Set the Frame Rate
The frame rate determines how smooth your video appears. The standard frame rate for most KineMaster Videos is 30 frames per second (fps), which is adequate for YouTube. However, if you’re working with high-action footage, you might consider exporting at 60 fps for an even smoother result. KineMaster allows you to select the frame rate that best suits your video.
Adjust the Bitrate
The bitrate affects the quality and size of your video file. A higher bitrate results in better quality but also a larger file size. For YouTube, a bitrate of 8 Mbps (megabits per second) is generally recommended for 1080p videos. KineMaster Videos allows you to adjust the bitrate during export. If you’re unsure, sticking to the default settings usually works well.
Export the Video
Once you’ve chosen your settings, it’s time to export the video. Tap the “Export” button in KineMaster, which looks like a share icon, and then select your desired resolution, frame rate, and bitrate. After confirming your settings, tap “Export” again, and KineMaster Videos will begin processing your video. This may take a few minutes, depending on the length and quality of your video. Once the export is complete, your video will be saved to your device’s gallery or camera roll.
Now that your video is exported and ready to go, it’s time to move on to uploading it to YouTube.
Step 3: Open the YouTube App
With your KineMaster Videos file ready, the next step is to open the YouTube app on your device. The YouTube app is available for both Android and iOS devices and is essential for uploading videos directly from your mobile device.
Sign In to Your Account
Before you can upload a KineMaster Videos, you need to be signed in to your YouTube account. If you haven’t already signed in, you’ll be prompted to do so when you open the app. Make sure you’re signed in to the account where you want to upload the video. If you have multiple accounts, double-check that you’re using the right one.
Navigate to the Upload Section
Once you’re signed in, navigate to the upload section of the app. This is done by tapping the “+” button located at the bottom of the screen. This button brings up several options, including the ability to upload a KineMaster Videos.
By this point, you’re ready to begin the upload process. The YouTube app makes it easy to upload your video directly from your device’s gallery.
Step 4: Upload Your Video to YouTube
Now that you’ve opened the YouTube app and navigated to the upload section, it’s time to get your video online. This is the part where you’ll choose your KineMaster Videos, add details like the title and description, and start the upload process.
Select Your Video
Tap “Upload a KineMaster Videos” from the options that appear after tapping the “+” button. This will open your device’s gallery or camera roll, where you can select the KineMaster Videos you exported from KineMaster. Scroll through your videos and tap on the one you want to upload.
Add a Title and Description
After selecting your video, YouTube will prompt you to add a title and description. The title is one of the most important elements of your video, as it’s the first thing viewers will see. Choose a title that is catchy, descriptive, and relevant to your content. The description should provide additional information about the video, such as what it’s about, any important details, and links to related content. Including relevant keywords in both the title and description can help improve your KineMaster Videos visibility on YouTube.
Add Tags
Tags are keywords that help YouTube understand what your video is about. They can improve your KineMaster Videos chances of being discovered by viewers searching for related content. Choose tags that accurately describe your video’s content. For example, if your KineMaster Videos is a tutorial, include tags like “tutorial,” “how-to,” and the specific topic of your video. YouTube allows you to add several tags, so make sure to use this feature to your advantage.
Choose a Thumbnail
The thumbnail is the image that represents your KineMaster Videos on YouTube. A good thumbnail can attract viewers and increase the chances of them clicking on your video. YouTube automatically generates a few thumbnail options from your video, but you can also upload a custom thumbnail. A custom thumbnail gives you more control and allows you to choose an image that best represents your content. Make sure your thumbnail is clear, visually appealing, and relevant to theKineMaster Videos.
Step 5: Adjust Settings and Publish
Before you hit the “Upload” button, there are a few more settings you’ll want to adjust to ensure your video is set up correctly on YouTube.
Privacy Settings
YouTube gives you control over who can see your video. There are three privacy settings to choose from:
- Public: Anyone can see your video, and it will appear in search results and on your channel.
- Unlisted: Only people with the link can view the video. It won’t appear in search results or on your channel.
- Private: Only you and people you choose can view the KineMaster Videos. It won’t be visible to anyone else.
Choose the setting that best fits your needs. Most users choose “Public” to share their videos with the widest audience possible.
Audience Settings
YouTube requires you to specify whether your video is made for kids or not. This is important for complying with the Children’s Online Privacy Protection Act (COPPA). If your KineMaster Videos is specifically made for children, select “Yes, it’s made for kids.” If not, select “No, it’s not made for kids.” This setting affects how your video is promoted and who can see it.
Monetization (Optional)
If you’re part of the YouTube Partner Program and want to monetize your video, you can enable ads before publishing. Monetization allows you to earn revenue from ads shown on your video. To enable monetization, go to the “Monetization” tab and turn on ads for your video. You can choose the types of ads you want to display, such as skippable KineMaster Videos ads, display ads, or overlay ads.
Publish Your Video
After adjusting all the settings, it’s time to publish your video. Tap the “Upload” button to start the upload process. The time it takes to upload will depend on the size of your video and your internet connection speed. Once the upload is complete, YouTube will process the video, and it will go live on your channel.
Conclusion
Uploading a KineMaster Videos to YouTube from KineMaster is a straightforward process that can be done in just five steps. By following this guide—editing and finalizing your video in KineMaster, exporting it, opening the YouTube app, uploading your video, and adjusting the settings before publishing—you can easily share your content with a global audience. Whether you’re a beginner or an experienced content creator, these steps will help you get your video online quickly and ensure it looks its best. Now that you know how to upload your KineMaster videos to YouTube, it’s time to start creating and sharing your amazing content!
FAQs
1. Can I upload videos to YouTube directly from KineMaster?
No, you need to export the KineMaster Videos first and then upload it through the YouTube app.
2. What resolution should I use for YouTube videos?
1080p is recommended for most YouTube videos to ensure high quality.
3. How long does it take to upload a video to YouTube?
Upload time depends on the size of your video and your internet speed.
4. Do I need a YouTube account to upload videos?
Yes, you must have a YouTube account to upload videos.
5. Can I monetize my videos uploaded from KineMaster?
Yes, if you’re part of the YouTube Partner Program, you can monetize your videos.
6. What should I include in the video description?
Include a brief summary of the video, relevant keywords, and any important links.
7. Can I edit my video after uploading it to YouTube?
You can make some edits, like trimming the video or adding annotations, but major edits should be done before uploading.
8. How can I improve my video’s visibility on YouTube?
Use descriptive titles, tags, and thumbnails to attract more viewers.
9. Is it necessary to set the audience for my video?
Yes, YouTube requires you to specify whether your video is made for kids or not.
10. Can I delete or unlist a video after uploading it?
Yes, you can delete or change the privacy settings of your video at any time.